Showing posts with label artsy. Show all posts

Wednesday, March 16, 2011

gettin ready for st. paddys day the tortilla way


I was in the mood to create something fun
with the kiddos for
st paddy's day
it involved cutting shamrock shapes in tortillas
(I found that warming them in the micro for 10 seconds helped)
nonstick spray was used for the pan
and on top the tortillas
and then I had a (very) cute trio of boys
who (generously) sprinkled green sugar on top of the shamrocks
and they did a super job!
(minus the bowlful of green granules that ended up all over the floor.....)

when the shamrocks were as green as envy
I put them in a 350 degree oven until light brown on the edges
(about 4-5 minutes)


the boys had a blast and I've already sampled one--
lightly sweet and crunchy
and YUM!


ENJOY!

have a SUPER wednesday, blogger b's!


Love, Laurie for the fam

Monday, January 17, 2011

making some dough


Easy Peesy Play Dough
1 c flour
1/2 c salt
1 c water
1 T oil
2 t cream of tartar
food coloring
Mix ingredients over medium heat until a ball of dough forms
You can knock out 4 colors in about 45 minutes and have all the playdough
fun your heart has ever longer for.....
Have a LOVELY Monday!
linking up here

Thursday, January 6, 2011

Flower. Power


If it can be done with a glue gun, people.....I can do it.

Craft, that is.
When I saw these (ok.....don't really look at the original and see that mine is just the ghetto version....)
Just kidding. You should totally check out the original that mine's based off. Her's is super super cool and sewn and everything. I'm pretty sure she rocks the crafting world with Martha and Ashley Ann and all those other cool crafties.
But here's my version.
Made with some felt I had leftover from this flowery project.
Remember these?

So, anyways, here's the tut (toot) :

Cut out a rectangular shape for the base of your bookmark.
Then I used an applesauce lid to trace for my larger petals (you'll need 2 of these circles)
A milk cap traced was the perfect size for my smaller petals. You'll need 2 of these as well.

To make the petals you cut the circles in half.

Beginning with the larger petals, arrange them on your bookmark like so...


Layer with your smaller petals. Over under, over under....


Then I added a super small piece of felt for the middle and put a coffee bean on top.

Because I like coffee. But you know what? If you are a lima bean person, you go right on ahead and put a lima bean on your flower. That would be awesome.


Did I mention you glue everything together with your trusty glue gun? No sewing involved, people. Just the magic of hot, sticky glue......careful, it burns.


Have a wonderful day..... Sun's shining here--YAY!
p.s. click here to still have a chance for my GIVEAWAY WEDNESDAY....one of these bookmarks (or 55 Hershey Kiss wrappers if you'd rather!)


+2 = 6 down, 494 to go


                                                                     linking up here

Tuesday, December 14, 2010

TT Gumdrop Wreath

I've wanted to make this Gumdrop Wreath for a long time now.....ever since I saw it here on Martha's site.
But Martha, Martha, Martha
White is boring
And I don't have the desire to sit and make my rows of gumdrops super straight like you.
So here's my version. I just want to eat it.
But not really because I enjoy looking at it.
And it smells super sweet--which I wasn't counting on.
Happy Tutorial Tuesday, All...

Gumdrop Wreath
Needed:
Gumdrops (it actually took me 3 1/2 bags this size)
Styrafoam wreath (40% off Michaels coupon. boo. yeah.)
Toothpicks!
Ribbon (just a small piece to hang wreath)
Break your toothpicks in half and put the broken end in the middle of the gumdrops. Push the pointed end into the styrafoam.
I was really glad to get some help on this. I'm not a "putsy craft" kinda girl and this craft was pushing the limit....
However, when I noticed my middler licking one of the gumdrops he was put on "Observe Only" status.

It's really pretty easy to space them as they are a squishy candy to work with. You can pretty much squeeze a gumdrop into the space you want it to fit.
Whew. I was worried Martha made her rows super straight for a reason. Nope. She's just like that. You go, Martha. There's a reason you rock the crafty world.
I found that making these flower looking patterns over and over again helped with making sure I wasn't having 2 gumdrops of the same color touching each other.
I was particular about that. A girl's gotta have her standards, you know.
Cover all styrafoam except the back. You don't want a sticky wall, do you?
Okay. How fun is that all lit up by our Christmas tree?
I love this time of year! Thank You, Jesus, for a Wonderful Reason to celebrate!

Tuesday, November 30, 2010

TT Signs of Christmas Cheer

Blogger Buddies,
I'd like you to meet another guy in my life


Know him? He's got amazing skills with flour and fondant and is known on TLC as the Cake Boss. But he's just the sweetest boss ever and....don't you just want to squeeze those Italian cheeks?! Okay...after that comment Justin may not be so kosher with my crush anymore.

But he's also the one who has nicknamed this guy my "Hoboken Hottie" so I'm thinkin he's pretty secure in the whole thing. Plus he chuckles everytime he sees Buddy's face on the screen.
What?!
Any chance the Cake Boss would come for a visit and help with the James fam birthday cakes in 2011?
Hey,  a "cake mix, canned frosting" girl can dream.

ANYways. Did you see the fun Christmas signs from yesterday? If not, scroll down and check them out to catch the vision of the tutorial to follow. You could always turn on TLC and see if Cake Boss is on to watch while you make these signs.....of course, make sure you've got some chocolate handy because you're going to want some by the end of the show. Guaranteed.

Signs of Christmas Cheer
Supplies needed:

black frames (I used cheap ones I already had, about $3-4 at time of purchase from W-mart)
assortment of scrapbook paper (already on hand)
green felt (on hand)
sparkle snowflakes ($1 for pack of 4, Target)
red sparkle letters ($3.99 on clearance at Michael's)
scissors and hot glue gun

Step 1: pop the glass out of the picture frame trace the back of the frame on the scrapbook paper to get the exact size needed.


Step 2: Cut the paper down to the needed size to fit in the frame


Step 3: use double-sided tape to attach the paper to the back of the frame. UGH. I was so frustrated my tape-runner wouldn't run so I had to pull out the tape and attach pieces individually.

Step 4: Decide on the phrases you'd like to make signs with and see what you can do with the letters given.

My goal was to make as many phrases as I could with my package of 45 pieces. If I hadn't lost a letter "a" I'd have a sign with the word "PEACE" as well.

Creativity came into play when I had to trim some letters to make new ones:
"n" became "r"
"k" became "l"
"w" became "v" for 2 different signs
etc, etc...

Trim the felt to a triangle shape for the "Merry Christmas" sign, if desired.

Step 5: Arrange letters on the papers and then secure with double-sided tape. Hot glue is needed to attach the snowflakes to the frames.

So fun. If you make one I'd love to see a picture of it !

Tomorrow is The. Day. to. Decorate. here at the James house. Exciting stuff.
Enjoy decking out your place!

Monday, November 8, 2010

These Are Addicting...


I bet you saw the title and instantly thought: some kind of chocolate... I know I would've. I'll bet you never expected to see a picture of felt flowers. But seriously....once you start making these cute little (simple) creations--I'm telling you, you're going to be addicted.

Because I'm such a crafty individual (insert laugh), I saw this "how to" on making felt flowers and I decided to give it a try. I'd love to include the link to where I found this wonderfully easy art project.....however, it's not exactly where I thought it was when I went looking for it on the world wide web. Given that this is not rocket science I will just include the phrase "this is not an original idea" and hope that you forgive me for not giving credit where it is deserved.
Warnings:
Extremely addictive project.
Hot glue is hot and will begin to burn any fingers it comes in contact with.
When a finger is burning from hot glue do not give into instant "insert into mouth" reflex.
Hot glue is hot in your mouth as well.
Do not use the same scissors used to cut the tops off yogurt sticks for your kids.
Do not use the same scissors used to trim your candle wicks.
Do not use the same scissors used to cut the fat off your chicken.
(Note: all of the above warnings I give from personal experience...except the chicken fat scissors which was given for entertainment purposes only)

Directions:
Turn on TLC. LA Ink again?!
Turn on HGTV
Cut felt circle (about 3 inches)
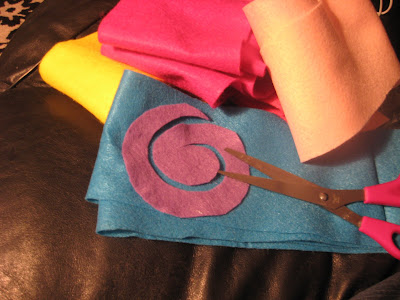
Cut a swirly on the felt circle

Begin twirling the felt, making the outside of the swirl the inside of your twirl

The inside will be left at the end and that is the part that will be hot glued to the bottom to make a base for the flower.

Repeat.

How fun is that?!


Question for YOU: I have made a ton of these flowers. What do I do with them?

Tuesday, October 26, 2010

TT Light Sabers & J-O-Y Wall

Today I bring you 2 tutorials: BONUS!

Neither of them food (chocolate) related: BUMMER!


The first tutorial is inspired by
a broken window,
a plastic light saber
....and the fly that got away.

(NOTE:All plastic light sabers have now been banned from the James household and are designated for outdoor light saber duals only)

Tutorial #1 Foam Light Sabers

Needed:
  • pool noodle (buy them now....clearance section at Wal-mart!)
  • serrated knife
  • black electrical tape


Step 1: cut pool noodle in half
Step 2: wrap black tape around one end for a "handle"

Variation: don't chop the noodle in half and wrap black tape around the middle for a double-ended saber. Way cool-- at least at this house!


I'm thinking I just need to sit down one of these days and (finally) watch a Star Wars Episode from start to finish. Maybe then I will get why my boys shove the light sabers down the back of their shirts and run around the house.
But then again, maybe I will never understand. That happens sometimes when you're a mom of boys.


Tutorial #2 Who couldn't use a little more JOY in their world--so let's put some on the wall...

I wish I had one of those cool cameras that would make this picture look better. But do you get the idea?

Needed:
  • 3 matted frames to hold 8x10 pictures
  • JOY cardboard letters--(2 sizes--medium for the wall, large for pictures)
  • black paint
  • fun appliques for JOY letters
  • your camera
  • your happy, cooperative family
Step 1: Grab your large letters and go take some pictures. This is the fun part! Take tons and tons of pics so you have plenty to choose from. That's the glory of a digital camera, right?

A note about the J-O-Y letters: the cashier at the craft store told me I was "so smart" (why thank you!) for buying my letters now, in the fall. Apparantly everyone wants JOY at Christmastime and they sell out like crazy. So if you're thinking this might be fun...act now!

Step 2: Have your pictures developed in 8x10. Make sure they are all going the same way...vertical or horizontal (duh, right?)

Step 3: Paint your medium-sized letters for the wall and put your appliques on. I used "me and my Big ideas" chipboard embellishments (32 piece)
Step 4: Put it up! Poster putty is a wonder in and of itself and holds up the letters just fine.
Step 5: Stand back and feel the JOY filling your heart. Ahhhhh

I love the daily reminder to be filled with joy. It's not some "happy happy joy joy" giddy smile on your face at all moments even when life stinks. NO-- Joy is so much deeper than that. We're just beginning to explain to our kiddos what joy is all about. For now, we're keeping it simple...
Caleb, with his 4 year old enthusiasm, will tell anyone and everyone who enters our living room and sees our JOY wall that it's about
Jesus first
Others second
Yourself last

Who knew such a teachable moment could come from wall decor?